Charcoal BBQ concept - T1
Charcoal BBQ concept - T1 results
Charcoal BBQ concept - T2
Charcoal BBQ - T3
Charcoal BBQ - T4 (results to come)
Test 4 set to burn


You might remember a few years ago I posted about a very special English Walnut tree that was milled at DF Timber Ltd in Cumbria. Every now and then other exceptional trees, felled locally, come through the mill and we get to see their story prized open and see all it's potential in it's full glory.

A few months back a huge English Oak tree was next to be milled. It had been growing in Portinscale, down the road from DF Timber, for probably well over the 250 year mark. Huw from DF Timber mentioned that it had been pollarded* but it had probably been dying for a long time as it didn't have any new growth. It was felled in 2012 and sadly had a fair bit of heart rot but with a tree this size its still worthwhile buying it.
(*Pollarding - a technique of tree pruning. By cutting the top branches you encourage denser growth throughout the tree. Traditionally it provided fodder for livestock and timber/firewood. Very similar to coppicing but raised off the ground away from munching mouths of deer and sheep etc...)

All in all it weighed over 3 tonnes, 95 cubic feet and was way too big to fit on even the scary, beastly green mill. Huw had to whip out the long bar chainsaw and cut it down to size first.
What also makes this specimen extra special is the amount of bur evident within it's timber. You can see a huge round bur growing out the side of this tree - it's almost as big as Huw! - and there's plenty more all around it's trunk.

A bur is a strange, unexplained growth made up of dormant buds and twisted grain. Commonly believed to be the trees reaction to the stresses of the world, like the Elephantiasis of the tree world. Yet, cut below the bark and these ugly growths hold the most coveted markings for furniture makers, sculptures and turners. Clusters of varying sized knots, surrounded by dense and open grain can sand, buff and oil up to stunning results. Assorted colours play with the light. Often it's such a beautiful mess it's hard to know which way up the tree was.

With a big chunk of Oak to get through, even the long bar chainsaw ( 36inches ) proved tricky to make a clean cut all the way through. Huw got as far as the chainsaw allowed before using simple wooden wedges to smack all along the cut he'd made, forcing the tree open. Splitting wood is one of the easiest and satisfying procedures for cutting up greenwood* - if it has clean and straight grain - throw a big bur in the way and the wood won't know which way to split! It needed some extra welly!
(*freshly felled/cut or non seasoned timber)

Finally separated and it's beautiful, dark colouring gives away only a hint of what this tree has to offer. Sadly, the heart is a little soft, but the timber around it will have plenty to make up for it.

With the Woodland Laboratory and new compression jig set up I set to work tweaking the process again and again until I had worked out the exact formula to make my Lignin board. I needed to find out what wood available in the woodland would work best, if any. My experiments also needed to work out the best compression and drying process. There were certain controls in the set up that were not changed; 300g of green (fresh) chainsaw shavings of each wood type, 2.5 litres of cooking liquid and around 1 hour of cooking in a pressure cooker. In total there were 25 tests done with this set up, with each test something new was learnt or observed and the next test was tweaked accordingly, sometimes this even included the controls. Through this trail and error method I learnt about my material, its particular behaviours and fine tipping points of its process.
The early tests were fairly fragile and not at all strong. They stuck to the mould, came out damp, expanded once released, burnt, came out uneven or crumbed completely. Sometimes I thought I was wasting my time and it just wasn't possible.
I added foil to help release the samples from the mould. Measuring the shavings and making sure they were spread out evenly under the compression plate also made a huge difference.
I was using the blow torch onto the surface of the mould but with no insulation. I knew from the beginning that this wasn't at all efficient and was frustrated that all the heat was going out into the atmosphere. I also dreaded heating the mould with the bottle jack so close to the blowtorch. The mould was modified so two bars could be slipped through the mould to hold the pressure plate in place and the bottle jack removed so the whole mould can be placed in a kiln for heating.
Unfortunately it didn't work. It needs to have constant pressure applied throughout the process, especially as the water is forced out. I was also experiencing most of my samples coming out damp. I couldn't quite understand why parts of the sample were promising and bonding well and others just flaky shavings.
The tests continued. I stopped using potash, water seemed to work better. Oak, being very dense, was near impossible to get to vaguely work so I ditched it. Ash was the most consistent in postive results, but none were bonded evenly across the whole sample.

Then that ureka moment! Drilling holes into the top compression plate allowed the water to steam off easier. All those times when I openned up the mould and the sample expanded or felt damp, it was because the steam could not escape - so obvious!
The first sample with the modified mould was a great success. It was dry, solid and strong with very little flex. I was able to cut it with the bandsaw. Once I had continuously made simular samples, all in Ash, I got their strength tested.

I owe a huge amount of graditude to Paul Burke, Civil Engineer Imperial College and fellow honourary Cumbrian. Paul is incredibly knowledgable in sustainable energy and policies. Many a tea break have we discussed the various alternative energies available or being developed. Thankfully, he completely understood where I was coming from on this quest to find a relevant use for coppiced wood and was never too slow to remind me how worthwhile it is.
Besides bigging up my lagging confidence, he very kindly helped to test the stress point of my samples to see how strong they are, especially in comparison to existing OSB products.
My Just Wood material has the stress point of 9N per mm. That's 1/3rd of the strength of the same thickness OSB! Not bad for a few handfuls of chainsaw shavings.
With my process and material perfected it was time to take the next step - moulding forms!
A long over due post detailing that final push of my Master degree project, Just Wood. I left the last post basically describing all the resaerch I had compiled and how I could pull it all together into one perpetual cycle of growth, harvest, waste, process, product and back to growth again. It was a rabbit hole that I was reluctant to leave and with hindsight (it is a wonderful thing) I was causing lots of conundrums for myself. That's what happens when you can do anything.
So here's how I went from my first successful sample of Lignin Board (glueless wood material made by compressing waste chainsaw shavings - blog post here) to a process that generates strong, formed components for use in furniture, all in my wood somewhere in the depths of North Cumbria.
I knew the basic principles of compressing cooked shavings will work, I had a very exciting sample. The next job was up scaling that set up so I could perfect the process, see what works and what doesn't and hopefully produce a production line for manufacturing a component of some description.
Off I went to find a Blacksmith. The wonderful thing about Cumbria is that you're never to far away from someone with a shed, making anything or everything in metal, or wood, or clay or wool etc. Fortunately, 15 minutes away in Gilcrux lives David Watson. A blacksmith who specialises in fabrication and Norman forges. It was through his hard work, unwaived patience and endless cups of tea that I was able to push my leftfield ideas.
First off, he put together my test frame, designed to hold a 20 tonne bottle jack that will compress my cooked chainsaw shavings.

A little butane blowtorch didn't seem to be the job, and my fears were confirmed when the mould was prized open. The shavings were still damp. The pressure did not seem to have been enough however, were the biscuit tin had a seam or corner the shavings were looking more like one material. Not the best result, but enough to get me thinking there was something in it... I had to go bigger. Welcome to the Woodland Laboratory! (aka Pip Towers) My home for the next few months.
I moved in with shavings from 4 hardwoods typical throughout my wood, a few fermentation jugs full of my homemade alkali potash, a stove and a pressure cooker.
I had a new re-useable metal mould made up. A box with drainage holes, removable bottom and top pressure plate. Along with a proper butane blowtorch, I was ready to go full kelter and perfect my process.


 I have to say, I had never used a 20 tonne bottle jack or blow torch before, and certainly never together, at the same time, in close proximity to each other. To say I was tense and nervous would be an understatement. Safety marshal Chris was on hand - somewhere behind a large Ash tree. After all the varied ways I did this process and all the things I learnt each time, the fear of something bad happening never left. Don't try this at home is all I can say!
 In my last post I finished off by mentioning my increasingly love for my chainsaw. Yes it's loud and powerful. Yes I get to cut down trees - hugely satisfying. But essentually the chainsaw is a brilliant tool. While I was making my shaving horse I got a little impatient chipping away carving the seat, so I thought "Blow it, where's my chainsaw". Finding that with gentle encouragement and careful blade direction the chainsaw can make light work of carving, cutting, boring etc. Could this transfer into furniture making? Could my chainsaw be a portable mortising machine?
Again, using the Crack Willow was not the ideal timber, but I wanted to quickly test out the ease of boring out a mortise tenon joint. I was surprised, it wasn't ideal doing it freehand, but perhaps a jig could aid in accurate cuts.
My friend Paul, a greenwood worker and forester, helped me sketch up this 3D model to play with directions, pivots and heights that would be useful as a portable chainsaw CNC. Why was I so intent on using my chainsaw, apart from it being a fast and efficient machine?
At this point I had researched my material and the role it plays in the environment from the minute molecular level, the small scale craft traditions, all the way up to the industrial forestry management of softwoods. At each point there was always a cycle back to starting point - the woodland eco-system. No matter how big or small these cycles are, they could produce a number of by-products workable into my process. Chemicals, fuel, raw material, adhesives.. the list goes on.
By Charcoaling I was experimenting with the pyrolosis process - decomposing wood by heating without oxygen. This process gives off all sorts of gases, inparticular Carbon Monoxide, Ethanol and Methanol, all extremely flammable. YouTube is full of fun, crazy people using the gases in systems to power electrical generators, lawn mowers or even running cars around Europe! The best example I found, and the most fascinating fella doing amazing low tech things in the name of off grid eco living, in Texas - AllEnergies
In the quest for an on-site holistic system for manufacturing, generating my own power from wood felt like a momentus step in the right direction. I had discovered a simple moulding process for cooked chainsaw shavings, but I just wasn't satisfied - This project has researched into so any aspects of wood, as a varied resource. My imagination got the better of me, I wanted to run an electric chainsaw on wood! What a perfect loop that would be.
Cut down a tree. The trunk is planked, the shavings collected. The brash and branches are seasoned for firewood to boil the fresh shavings to mould. The heat could also be used to generate woodgas. The woodgas can be conbusted in a generator which in turn charges a battery for the chainsaw... etc etc. Had I more time during this project, I would have loved to see this happen.
 Here's a fairly late update from Jan's wood. Since my last post, March in Cumbria has been a whirlwind of all sorts of weather. There was, of course the mad snow storm which blocked our main road, and then while most of England was bogged down by heavy, relentless rain, we had 2 weeks of gorgeous bluebird days, extremely cold and windy, but wonderfully sunny. I managed to warm up the camera long enough to give a little idea of where I've been working.
 As soon as I got back to the woods from a good trip to London, I needed to get back to the wood and play, learning from books written by those who specialise in this organic material. By learning to use and manipulate the greenwood's properties like so many talented craftsmen before, I hoped to find way of developing a system that will allow me to create furniture. I'm a sucker for symmetry and I like to design the outcome, it's the control freak within, however, greenwood does not conventionally work this way. Perhaps there could be a compromise? Cleaving is a fascinating process of knocking a blade down the centre of the wood. It will naturally split along the grain. If the split travels in the wrong direction the tool, called a froe, can be levered one way or the other to encourage the split along a clean line down the length of wood. Hence, to and froe! This has given me some beautifully symmetric material, albeit still organic and irregular.
Another brilliant use of greenwoods properties that I have always wanted to explore is shrink joints. When felled, timber has the moisture content of 30% upward to as high as 60%. As it dries the cells shrink. Greenwood workers turn dowelled furniture components, pre-dry them and use them in green mortise holes. These mortise holes dry and shrink around the pre-dried tenons - glueless joints. I love this method, using only the natural behaviour of the material to construct solid furniture.
So I mocked up a silly chair sketch. Crack Willow was really not the most sensible wood to use, I'll admit. I have to add, during this point I was aware that this traditional process involves a long time. Greenwood workers are calm. patient souls, allowing their material to slowly dry or season. Unfortunately time is not my luxury, and in the scheme of trying to find an industrial process for greenwood, these exercises were not proving the right direction. While I was in London, and with access to the metal workshop at Uni I thought I'd have some fun making my own tool. I love the concept of cleaving, but I wondered if that moment of splitting could be capitalised to form extruded shapes. Would I be closer to making my uniform components from supple greenwood?
Nope. The middle 'punch' of my tool did a good job of dowelling my log, until it got wedged in the grain. As for the splitting froe wings, the split ran away in front of the tool as soon as it got it's teeth into the end grain, so all control was lost. As this tool was a complex and lengthy process to make, I abandoned this idea. However it certain helped me understand the nature of the grain and inner structure of my wood. It did a great job of creating perfect tenons for my shaving horse legs!
While playing in the wood, making a shaving horse and fiddling with these ideas, I have become increasingly appreciative of my chainsaw. It makes light work of rough shaping and cutting to length, but it creates a great amount of mess. There are shavings everywhere! More about chainsawing next time...
 I had some willow shavings soaking happily in my potash alkali for a few weeks. Time had come to do something with it. Going back to the advice from Bio-composite Centre I re-boiled the solution with a bit of whisk/friction. After a 2 hour cook the shavings were scooped into my make-do metal mould. It was G-clamped up as tightly as possible and left to dry.
The shavings were checked after 3 days. Were the wood had dried and had been compressed the most, there was definetely bonding. Exciting stuff!
The sample was placed back in the mould and the whole thing was placed over a stove to apply some heat. It was left there to sizzle away until I was sure all the water had evaporated away.

Once everything had cooled, the clamps were removed. The shavings had successfully bonded together. The surface that was on the metal mould side and over the heat had a very smooth and shiney finish. I had created my own glueless particle board, a course masonite board.
I can only presume the cooked cellulose and lignin had acted as a bonding agent when heat and pressure is applied. Unforuntately the the material isn't water resistant, but there is still some potential with this aplication within my woodland.
 Getting preoccupied by the nitty-gritty of wood and what-not can really become distracting. I decided to go back to the wood, how it is now and when I freshly harvest it. What if I prepare the branches for bends or joints before I boil them? How long will bigger samples need in my pot?
I had a while, nearly 48 hours, to wait while my branches softened, so I made up a simple bending frame that will hopefully allow me to be flexible with my angles later (excuse the pun!)
Getting preoccupied by the nitty-gritty of wood and what-not can really become distracting. I decided to go back to the wood, how it is now and when I freshly harvest it. What if I prepare the branches for bends or joints before I boil them? How long will bigger samples need in my pot?
I had a while, nearly 48 hours, to wait while my branches softened, so I made up a simple bending frame that will hopefully allow me to be flexible with my angles later (excuse the pun!)
 We have begun to record a short of my work in the wood. Dom Bush, from Land & Sky Media has been visiting me in Jan's Wood to film a hefty Willow tree being felled.
We are also playing with stop animation to capture the regrowth of the tree, and the changing envirnoment throughout the spring and summer.
We have begun to record a short of my work in the wood. Dom Bush, from Land & Sky Media has been visiting me in Jan's Wood to film a hefty Willow tree being felled.
We are also playing with stop animation to capture the regrowth of the tree, and the changing envirnoment throughout the spring and summer.
Watch this space for more updates on this exciting project.

I'm on a quest to find a future for England's 649,000 hectares of unmanaged woodlands. Every year around 4 million tonnes of unharvested English timber is ignored, that equates to 800,000 tonnes of carbon store. To bring these forgotten plots of land back into management we could not only provide British industry with a vital raw material and fuel, but enhance and re-establish our declining wildlife, and ecology, something that can have a positive trickle effect on our agriculture.
My landlady's woodland, "Jan's wood", is my case study. What economical manufacturing process can I create within this 45 acre woodland, neglected but bursting with potential? So far I have been learning the intricate chemistry that lies within trees, and how this chemistry makes wood behave the way it does.
In particular, I have been referring to England's historical woodland based craft to understand how generations benefited from this material long before the Industrial Revolution.
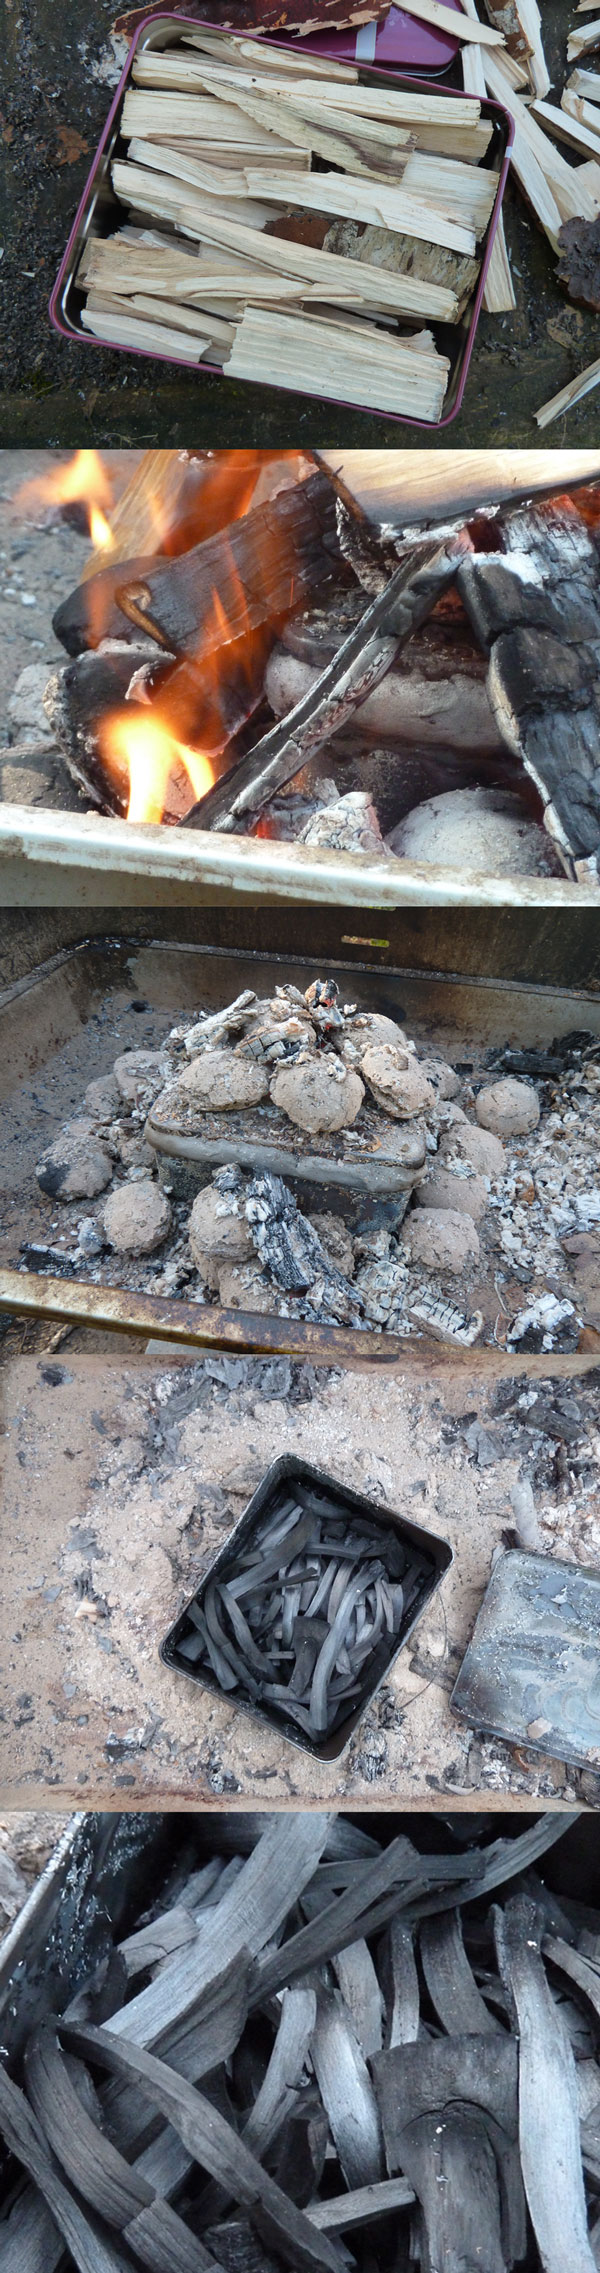
Charcoal is created by heating any organic material (animal or plant) to temperatures up to 300 C in the absense of air. It is essentially carbon, the atomic building block within everything on this planet.
However, it was not charcoal that I was in hoping to collect. The heat creates a chemical decomposition of the wood, releasing a whole pick'n'mix of chemical goodies in the smoke - Pyroligneous Acid. Traditionally the most sought-after ingredient amongst the condensed fumes in acetic acid, used as a fixative in dyeing cloth. Today, wood vinegar is promoted across the Far East as an organic and cheap pesticide and fertiliser.
I wanted to see if I could add to the chemical by-product menu I was developing to aid in my physical break down of wood. All in the exploration of the wonders of wood.
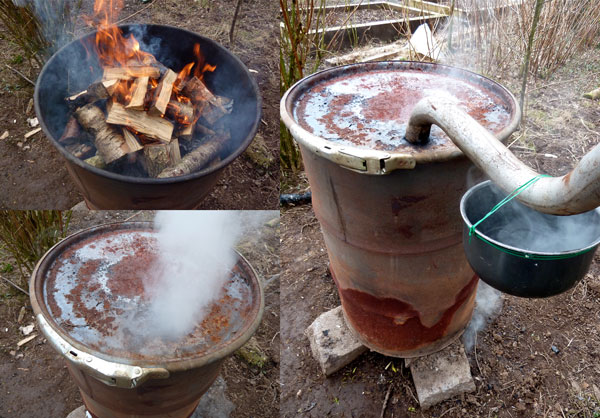
Frank, my little workshop helper, was back to help with the first burn. (If you spy any safety concerns, please ignore) ;)
A donated Transit van exhaust pipe was the perfect cooling chimney. It got incredibly hot, another source of energy perhaps?!
Only a small sample of the wood vinegar and wood tar collected. The yield was impressive considering the small amount of wood in the burner.
What a let down, it turned out to be a bit of a fail. My eager need to shut the burner down led to a drum full of chared wood. At least it was dry.
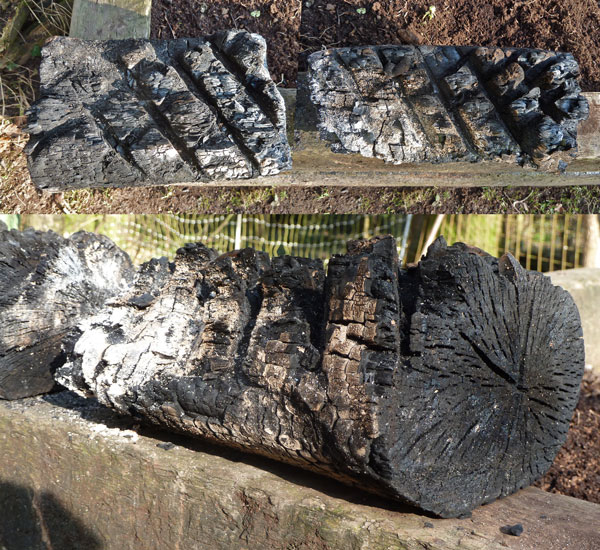
We decided to have a BBQ, regardless. Everything was looking very hopeful, until the burgers went on. Sod's law it would die!
What is refinement? Investigate the refinement of a base material towards the creation of a refined product. My starting material had to be wood. However, coppiced wood has been a draw to me for awhile due to its totally sustainable and low-impact cycle.

Coppicing is a tradition of woodland management; working to a cycle of growth of trees which have been sensitively selected and felled for regrowth. Trees have dormant buds lying in wait under their bark in defense to damage, like getting munched by Mammoths or stamped on by any other significant mammal. As the network of roots remain, replacement growth happens considerably faster than for a new tree to grow from seed. For centuries humans have manipulated this natural trait to provide an abundant supply of raw material. After every harvest, a tree stool will provide, on average, 3 times the number of new shoots. Historically, coppiced areas are left for 5-7 years to regenerate and produce quick grown, straight poles, prime for the greenwood craft industry.
Essentially, coppice is a sustainable and truely renewable source of carbon-neutral material. Whats-more, its potential is everywhere. There are around half a million acres of unmanaged woodlands in the UK. To see a new wave of industry utilising this resource for our markets and manufacturing would be a huge step forward for the conservation of our countryside.
The draw back in working with such a material is that it's inherent beauty and purity, it's organic-ness makes it difficult to take coppiced / green wood forward as a realistic contender for batch production. To work with it is labour-some and time consuming, if not for stunning results. Now, how can I make afford products with this environmentally affordable material?

Of all the green wood craft, I am most intrigued by Swill Baskets. The principle is taking green Oak, granted as straight as possible, and boiling it for at least 24 hours allowing it to be split to fine strips. Essentially the wood is being made into a generic form of itself, to be flexed and weaved into a basket. As it dries the wood hardens and the basket becomes incredibly strong.
It is the reaction of the wood to the boiling that has intrigued me. What happens to the make-up of the wood to make it go pliable when wet, and retain shape and rigidity when it dries?
To understand wood a little better, on a microscopic scale I got in touch with a research scientist from Innovia Films. They produce cellophane by the tonne. Cellophane is pure cellulose extracted from wood pulp. The process of extraction is fairly similar to paper making. Huge quantities of wood pulp are re-boiled in a water and Sodium Hydroxide solution; a soup that speeds up the separation of cellulose from the 2 other essential ingredients in wood (The Kraft process).

Now here's the bio-chemistry bit. Wood is made up of cellulose, hemi-cellulose and lignin.
 Cellulose is the structure of the wood. The molecular fibres which act together to create rigidity.
Hemi-cellulose is the 'string' that holds the cellulose fibres together.
This knot of cellulose is set in lignin. The 'resin' which glues the structural molecules together.
When the cellophane and paper makers, as well as swill basket makers, boil their wood they are diluting the lignin. In the example of boiling and steaming wood in the wood craft industry, the dilution of the lignin allows the wood to be bent and formed into new directions. As the water evaporates and the lignin condenses, the wood stiffens and retains its new shape.
From this finding I have been developing an interest in Lignin and what it's properties could be used for. Although a waste product from these different techniques, it has a great calorific value, it has more carbon content than wood itself. The Kraft process burns the recovered lignin to recycle its energy back into the system.
Understanding these two comparably different scales of wood manipulation, I started to wonder if the use of Sodium Hydroxide (Caustic soda) in the industrialisation of cellophane was completely necessary. Reading into the science of woods molecular bonds I believe a high pressure and high temperature hydrolysis method would be enough.
First step: Try to cook and separate wood at home with a Pressure Cooker.

 view")
The smaller the carrots the quicker the cooking, right!? I reused the brown water from the previous cook. I figured I'd intensify the concerntation.
Although the sight of a pressure cooker steaming away on the stove was a regular occurance during my childhood, I have no idea how to use one, especially when cooking wood for 6 hours. The water levels were calculated wrong and that was the end of this test.
These tests were an interesting starting point. I've been left with some interesting brown liquour. Somewhere, floating in this milk bottle is weaker bonded lignin. The wood has barely changed, so the cooking process definitely needs taken up a knotch or two.
To the laboratory...
Design Products MA: Platform 15 Project #1: Make a vase (a container that can be used to hold cut flowers)
My first project within our platform was a quick 2 week introduction to myself and my approach to briefs. We had a very interesting crit yesterday, it always amazes me the contrast and extreme differences of peoples response to projects at the Royal College of Art. Really fascinating!
Make a vase, a container of cut flowers. I considered on answering this brief with questions of why and how we, as a curious race, chose to capture moments of natural beauty out of context to its real existence. There is the view that it can be seen as the start of desire and not need, which brings us to consumerism and social impact our desires have on the world in all its facets. The can-of-worms wiggles out in all directions and bigger picture get even bigger..
The thing is, this opinion / observation is integral to who I am, and what I believe. The path I have made for myself is an expression of debate, mainly because I'm rubbish at verbal debate, I can only demonstrate. My reasoning for pursuing wood and hand craft is in response to these heavy issues. My ethos and morals are born from these realities. To some I might appear to be restricting myself to success and money, but that is not what I desire. I work to explore responsibility. Desire is a natural human trait, it is here to stay. However, it has grown to a point of distraction and destruction. Can we provide for our desire with a sense of responsibility?
So, it was a bit of a cop-out to chose to create my vase with wood, however, I knew my reasoning and debate was there in so much more depth than I think I could have presented in 5 minutes.

Essentially, a vase is a vessel to contain water. Besides tools and clothing, utilitarian forms to contain and transport was a change of man dictating his environment for his own convenience. The bucket or barrel, to me, is an incredibly important object. The idea to use the swelling properties of wood to create a watertight vessel represents the most intuitive use of material and it's properties. Wood is a living material. It comes from one of the most important living organisms on this planet. Nowadays the movement of a piece of wood is seen as a hindrance, an inconvenience. It's is engineered to stay flat and straight and square. Tamed for our desire. The wooden bucket is the product of skilled workmanship that only comes from an inherent understanding and respect for the material. It is very sad that this skill is becoming extinct. These days barrel making techniques are replicated by fast moving machines. When the last Cooper Master has gone, will the true understanding of cooperage and its unique understanding of wood be lost with him?
I wanted to explore the coopered vessel. Not reinvent it, just play with it. Stereotypically the bucket is defined by the structural steel rings that hold the swelling slats of wood in. Without them the bucket wouldn't work. However, I am making a vase, an object of desire and not utilitarian need. I wanted to create the vase without the 'bucket rings'. Ironically, my solution meant I had to CNC a precise bottom section that would replace the bottom ring. All the past coopers simultaneous turned in their graves!

I have been reluctant to embrace the CNC machine, but now that I finally have I will have to admit I'm ever-so-slightly converted.
For the tapered shape of the vase and for the success of a watertight product I needed to create precise side slats. There is very little room for mistakes. The angles are so important, half a degree out will not do! I made a jig with my hand plane and spindle moulded each slat as close to the finished width as possible.


 Replacing the top ring is where I got experimental. Flower arranging is great, but sometimes the flowers don't really stand up as well as you'd like. I figured a tension wire system on the inside could replace the top ring and provide a grid for the flower display. This is when doubt was expressed by a few members of the workshop. Wagers have been made, the stakes are high!
Bango machines and violin pegs were used for the pivot points. Two patterns of wiring was tried. The one with 2 machines worked best.
Here we go...


OK, it leaked! But I had suspicions this vase would, the bottom joints between slats weren't tight enough. I figured they would swell enough to compensate. However, the top part around the tension wire was fine, completely leak free. Does that mean I won the wager?! The test continues...

Here is 1 of 2 installments of the Wedding Gift. In this post I will whiz you through the process of creating the seating plan blocks and their etching. While planning this project I had in mind creating lengths of the necessary forms and then cutting them down to the appropriate size. However, when you are creating something fairly new and untested, plans are soon swiftly amended. I was fortunate enough to find all the timber necessary as off cuts in the machine room. Unfortunately, once they were machined and sanded to size, then passed through the spindle molder with the wobble saw, the lengths weren't as dead straight as I needed them. The natural tension in the wood is always at risk of giving way when it is brutally machined and shaped.

As soon as I had the lengths in the workshop and had set up the router table with a dovetail bit, it became clear I would have to fit the internal Sycamore strip to each individual block. It is in this situation that a fraction of a millimetre becomes magnified, and can make a break the quality of fit. By doing it in this painstaking way I could guarantee a perfect fit throughout the project, which was one of the more important details for me.

I wanted to create a patchwork of colour to show off the incredible natural colours of the material. Here they are in all their glory, from left to right: Oak, Yew, Cherry, Elm, Walnut and Ash, each containing the light coloured Sycamore strip.

There was a few days of hand planing the blocks. With a marker on the shooting board I trim them to size, while cleaning up the rough saw edges. My right arm was considerably bigger than my left afterwards!

On the final day of planing, a jig was made to hold the blocks while the Sycamore strip was planed back to leave a clean leave surface on every edge of the blocks.

Now, off to the Eden Valley to visit Joe Butler. Joe and his Father, Ian run Croglin Toys, the sweetest little toy workshop, based in Lazonby. They very kindly let me loose on their laser cutter, so I tucked myself up in their tiny little workshop to add the finishing touches to my Wedding Gift.
A grid was cut so the positions would remain the same. Each table was etched at a time, to avoid confusion or missing someone out. Final checks of spelling, number of names per group and laser settings, then *click sit back and watch. It's meserizing seeing the lettering emerge as the laser head darts left and right.As everyone in England is well aware, this summer has left much to be desired. Cumbria has had record amount of rain during June and July, exactly the time I was beaving away making these blocks. When I was about to head down to Gloucester for the wedding I did the final fine tuning to the sliding Sycamore bit. I convinced a little helper to pretend to play "wedding guest" and test the friction, and adjusted them accordingly. A quick rub with scented wax and they all slide wonderfully.

This project has really highlighted to me the difference humidity makes to this natural material. The temperature difference was considerable on the way South, and the blocks shrunk! I was gutted, my lovely fitting blocks were all loose. Ah well, the way of the material. They all looked smart lined up next to each other... and everyone managed to find their seats, which is the main thing.
I told myself I wouldn't cry, but when you attend the most the beautiful wedding of a very special couple indeed, it's hard to compose yourself. Emma and Oli have pulled an incredible event together in only 4 months, and if you were there, you'd know how impressive that is. The attention to detail and immaculate organisation was flawless. No cliché here; it was the most beautiful wedding ever! What a shame it came and went in a flash.
Sitting back home in the North Lakes and piecing together the memories and photos, I realise I have been in a World of Weddings. A few months ago the couple took me out for an innocent Dim Sum dinner in London. Little did I know it was bribery. I left sleepy and full of dumplings, with my head full of wedding plans and promises of church readings and to create the seating plan for their reception.

The brief was simple, 9 tables will be named after the destinations of their European roadtrip honeymoon. There will be around 180 guests.
I wanted to create something unique that would provide mementos to the guests and a keepsake wedding present to the Bride and Groom.
Many ideas came and went, including an 8 sided revolving picture frame. Eventually these blocks of wood, which reveal the table names, came about. They were created in 6 types of Cumbrian wood, each one with a contrasting Sycamore centre, dovetailed in to slide across. The names were lasercut into each one, fingers were crossed that there weren't any spelling mistakes!

The blocks were for the guests, but as they are removed they could be revealing something underneath too. It was decided the blocks could be contained in the wedding gift. Two frames; one Oak containing a subtle Oak leaf relief, and one Sycamore containing a Sycamore leaf relief.
I was honoured by so many people taking them home. Unfortunately the contrast of humidity between Cumbria and Gloucester during this crazy summer of ours affected the fit a little too much for my perfectionism, but overall I'm thrilled with how it turned out. The 'making-of' to be blogged soon.
Things seem to be testing me recently. I've been trying to see the funny side of it, but when things add up it gets tough. Take my computer for example, it's in the Apple hospital at the moment, having all of its insides replaced. Not a cheap proceeder. Turns out I've been on borrowed time for 2 years until it finally conked out. It's really thrown a spanner in the works, hence why I've been so distant recently. Ironically, it died just as I had finished and installed my stupidly organised computer cabinet at home. I guess the timing was perfect for my back ups, but now I have all my computer nogans hooked up neatly in lovely cabinet with nothing to do. Fingers crossed those Apple Genius' can make it new and happy again. Besides pleasing my obsessive organisational needs, I wanted to create a piece that tested the thickness, or thinness I should say, of solid wood furniture. Everyone knows wood moves and cups, and the thinner it is, as the theory says, the more likely it is to distort as it dries out. When furniture was being made from engineered materials like chipboard it meant clever veneerers could make thin lightweight pieces look solid without this risk. Unfortunately, I like these lightweight designs but love solid wood. Against all the advice in the workshop I went ahead and machined up 15mm Beech.

As it was only for me I designed the simplest set up, quite Utility Furniture-esque. My very generous Landlady, Jan, gave me a wonderful set of bead drawers, perfectly and naturally distressed, they'll be good for my filing and stationary. The depth of the whole cabinet had to accommodate these drawers and a 4 socket power extension, as well as my printer. The back was left open for easy access and wires.
Finally, I have been wanted to collaborate with Kim Butler for ages. Kim is the resident wood carver and can often been found chipping away on Danny's old bench, or scorching beautiful carvings outside. When I asked if she would add her finishing touches to my cabinet I was thrilled when she came up with these cute buttons. Her colour matching was spot on and really pulls my tatty old drawers into the whole scheme. Thank you Kim!
And so, the verdict. Well, it wasn't the biggest item ever, but it's not the smallest either, yet it has turned out fine. The top and bottom surfaces were extended past the sides by 2mm so that, if it were to open up, the join would remain neat. Considering there is some spalted Beech laminated together and jointed with not very large housing, the movement is minimal. There was some splitting at the end of the laminated top and bottom, that was super glued and clamped, however most of that was planed away during the finishing touches.
I conclude that 15mm solid wood is not a disaster waiting to happen, as long as it is done with lots of care and attention. This cabinet had a spacing of 400mm between upstands and carries very little weight. Something larger with lots of heavy keepsakes would definitely need something thicker.
...I also conclude that I am a neat freak.
I have been a very lucky lady. A few weeks ago I was offered a place on a trip to Romania for a Green Village Project, organised by Grampus Heritage and Training Ltd. They specialise in European projects, involving a number of countries, demonstrating, exchanging and collaborating traditional cultures, crafts and skills. It was set around a remote village close to Auid, Transylvania. The village is quite remarkable, for an ill-informed Londoner like myself. Almost every part of the function and survival of the village, the surrounding land and the residents, is sustained within their land. During our 4 day stay there we only ate vegetables grown by the host, Monica's grandmother, sausages and smoked meat from their pigs, eggs from their many chickens, wine and grappa from their grapes, water from their well, bread from their flour, pickles from their own vinegar, the list goes on. Lunchtimes were banquets of typical village food - all naturally delicious, and 100% organic.


However, we had to work for our lunch, the real reason the project was there, to build a traditional green fence strong enough to keep huge wild pigs off the potato patch. Using only one chainsaw and a horse and cart a few of us wandered up through the vast orchard (planted by the co-operatives of the Communist rule. When land and property was finally returned to their rightful owners there was a lot of work to be done by individuals, so some became neglected and left to ruin - like this orchard) to the woods and collected young trees no thicker than 2 inches. Back at the potato patch green poles were striped of their bark and spaced evenly. Removing the bark allowed the young trees to slide along the poles when they are weaved and pushed down.

Working with at least two young trees at a time, the weaving begins in a systematic way, always starting on one side and moving along one pole as you add. On the next row you start on the other side. Once a substantial 'base' has been created the trees are stabbed in the weave close to a pole and bent down, filling in any gaps or thin areas. It's definitely a two man job. The locals were full steam ahead and jibber-jabbered away in Romanian (fuelled with grappa) so I just stepped aside and admired the speed they worked at. Jumping on top of the weave to flatten it down seemed vaguely helpful, sometimes.
The finished product was beautiful, cheap and so strong, using all my weight it didn't rock at all. This years potato harvest is going to be a good one!

So, can we look to these people's example and see a sustainable future? This was the question I set out to answer on my travels via the metropolis of Manchester. I conclude not really. Our global society would not and should not step back to an almost medieval existence. However, there are things that make sense which needs to be echoed the world over. Firstly the understanding of how and where our food and resources come from.
If you appreciate the real cost or effort of growing a potato harvest fit to feed your family for the year ahead then I believe there would be a dramatic change in the amount of waste. A change that I think will echo in purchasing and consumption. This family rinse scraps from their pots and plates in a little bit of water to feed the dogs which guard their home. The chicken poo is collected and fertilises the potatoes. Everything has a use. In London we may not all have chickens, cows and a garden big enough to grow our veg, but we do waste food like it doesn't matter - that's from the disconnection. I wonder what a difference community compost heaps could make.
Another lesson to be learned is the use of the materials and resources we have to hand. Discounting the chainsaw fuel, labour and grappa, the material for our green fence was essentially free. The trees selected were the right size but also removed to thin out the woodland, something which every woodland needs for it to develop into a healthy ecosystem that can become a benefit environmentally and commercially. In England our wood product is practically a waste product of recreational programmes within our National Woodlands. There have been incentives and grants set to encourage people to plant trees but the important emphasis on what and how to use these new woodlands is dying out. Simultaneously industry has either replaced varied hardwood woodland for fast growing softwoods or extensively imported from as far as New Zealand. I can see a catalyst for change happening from a creative look at what we need and how it can be provided for by what we have already.
The first thing that grabbed me as we drove into the village for the first time was the strange, alien-like trees dotted around the landscape. The ancient art of pollarding and coppicing Willow is clearly still widely practiced, and as I found out, vital to everyday life. Here at home, we have hundreds of years history of coppiced woodland. Aside from being beautiful homes to all varieties of insects, birds, mammals and wild flowers they provided firewood, food and materials. Once you coppice you realise how resilient and amazing trees are. The more you hack at it the more it'll grow back; three times more shoots for you to harvest and use next year. Once upon a time all of our necessary materials came from what we had around us. I have begun to really ponder on the realities of a fresh look at this tradition for some of our needs today.
 Finally, I must touch on the pros and cons of 'Working with your hands vs. Working with machines'. It's an age old debate and many people, including the Arts and Crafty lot 100 years ago, have approached it far better than I ever could. The point I will highlight though: the debate is still happening and still as important. The reason why this Romanian village is beginning to struggle is the fact that the young people are moving to the cities to find work. Tending the land by hand just does not pay. The orchard has been left to waste because it would take a huge, fit team to prune and harvest it every year. The price of food has dropped because of the use of machinery, for organic hand grown produce to compete just isn't viable. I visited the market where all the local farmers trade and swap their spoils, these people know and understand when and how food grows, so they know not to buy things out of season, why? because otherwise it doesn't taste as good, simple as that. Back in the UK we've lost that and prioritise cheap and all-year round convenience over flavour and nutrition. Looking at these big issues through the food market is helpful. It encapsulates what the consequences of industrial trends are because it's an everyday need. The product and furniture market roughly follows the same story, with a few extra things thrown in. The machine has opened up so much to so many people, which is a good thing, for the short term. We are at an advantage point, where everyone (in the UK) has access to their basic needs, from here we can begin to plough forward with long sighted vision. The slow food and organic movement started from a change of attitude of the buyer. People began to demand better because it's better for them in the long run. Can this not become the big trend of the mid-twenty first century?
Not too long ago a very special tree was brought to the timber yard, a local Walnut tree. What was once a common timber, English Walnut has become a rare sighting. It has a beautiful grain, dark and rich colouring which is hard and tough but a pleasure to work with. It was particularly popular for gun stock and carving, as well as mid-twentieth century furniture, along with other exotic timber with similarly dark colouring, like Teak and Rosewood. Nowadays most Walnut is imported from America or Europe, and usually in veneer form.So, when it was time for this tree to be milled, it's no surprise that there was an audience!
The exciting thing about watching timber milling is the story that is gradually revealed. Like a huge book of history. The average age of a tree that is milled at DF Timber is 50 to 250 years old! Everything that surrounds the tree throughout it's life marks and affects it over time. It stores events in its shape, grain and natural character. Once felled and prized open, these events can be seen, sometimes in a poetic flow, other times in sudden and dramatic forms.

Only Huw has the guts to operate the big green timber mill. This beast is loud and scary. It shakes and vibrates like nothing and spits out sawdust and all sorts at quite a force. It can cut a tree up to 4 ft wide and 25 ft in length, not the biggest available commercially, but has served DF Timber very well.

With every tree that is milled there is always the risk of the blade hitting something that is within the timber. Throughout history trees have been convenient fence posts, notice boards, gate posts etc etc. If a blade, like the 120mm wide blade on this big mill, were to hit anything substantial it could be lethal. Everyone is on high alert!
This Walnut tree came from a garden, prime spots for all sorts of metal and stone to get lodged in a crotch or trunk, eventually having the tree grow around it. It was on only cut No.2 that we hit a problem.


Right in the heart of the tree were two huge old nails. Going by the size of the tree, they must have been hammered in at least 100 years ago. For what reason - who knows! I'm sure the guy had no idea he was going to completely mess up our blade, 2011. Metal in trees stains and spreads up and down with the sap, so if you're buying any trees and you know there's going to be metal in it, best not bother.

The Woodmizer can cut far more accurately. Here's George, the resident joiner, checking up on Huw's alignment. A guitar maker had already bought one side of the heartwood. The other side of the heartwood was going to a gun maker. Needless to say, it wasn't long until every part of this tree had been snapped up.

It couldn't be a better day. The sun was so bright and warm, the walnut grain looked absolutely stunning in it's light. By this stage we were all oogling at the colours and sweeping grain marks. It was a little sad to know that it will eventually be cut up into considerably small components, instead of being used for a piece that can show off its entirety. You can't be too precious, I told myself.
I'm so glad I got to see this beautiful wood in this process. Confirmed: Walnut is most definitely my favourite wood.
