Charcoal BBQ concept - T1
Charcoal BBQ concept - T1 results
Charcoal BBQ concept - T2
Charcoal BBQ - T3
Charcoal BBQ - T4 (results to come)
Test 4 set to burn


Following on from February (sorry!).... With the Octagon legs and shelves fitted nicely together, next was marking up and cutting out the housing for each leg to the thick top.
To hide the TV wires from the front elevation the back panel is set forward a smidge with the intention that its edge would match vertical slats to be installed later - keeping an open and light weight appearance and not so boxed in.

This back panel, in two parts, really needed to be lined up bang-on, so marking out the housing on both shelves and the top perfectly was really important. The panels were left extra long for trimming to the shelf line-up further down the line.

The spacing between the legs was divided up evenly for the slat mortises which were marked up and then cut by hand. As the legs, and therefore the shelf edges are on a slight angle the top part of the mortise went a little further. The middle surface of the mortise, within the thickness of the shelves, was hollowed out a millimetre or so to allow clearance for the slats. The timber will shrink over time so to minimise the slat joints opening up the sides of the mortise was kept as tight as possible.
Selecting the best grain and marks to be visible from the side, the slats were tapped into place. To keep the joins neat the slats were left protruding beyond the shelf edge. Once fitted the slats were coded, they will be fitted to the rest of the cabinet from their allocated position. Smaller slats were added to cover up the edges of the back panels - disguising them as a slat.
While in a dry fit the under side of the top was marked out were the slats meet. Using the router to remove most of the material, the joints were finished up and cleaned up by hand. My chisels had just been serviced so I was loving getting the edges and corner as sharp and square as it would let me.


Two long, shallow Mackintosh-esque chamfers were added to the under side of the top with a hand plane.

Having played with many different designs for the plug holes, decision making was getting tested - sometimes over thinking things doesn't lead to much. Going from the dimensions of the British electrical plug, I wanted to create a shape that gave interest, breaking up the rest of the lines of the console. Referring back to my library of Arts and Crafts images, this shape was borrowed as it would allow the wires to fall to a central place.


Once sanded through numerous grits and oiled with Danish oil the English Oak really deepened to a lovely rich colour. Getting in between each slat with an oily rag was slow but the overall scheme came together well.

Things have been pretty quiet from this end - but all for good and exciting reasons. I've been cooped up hunched over a computer for my next project, and it's a biggun! Snippets and teasers to come soon enough. But there's no excuse for not having updated this blog with my last project - the TV Console. The brief was for a self-contained TV Console to consider wires as well as existing furniture in the clients home.
Cumbrian Oak felt like the obvious choice of timber for such a stylish home. As the side of the Console will be seen from the stairs, along the corridor and in front of the TV room door, the design revolved around this vista. Using vertical slats, reminiscent of the Macintosh style, a back panel to hide any wires was incorporated into the look, but still retaining an open appearance.
The details definitely threw in some challenges , but overall this was a joy to make. Becoming completely absorbed into a piece on the workbench is something I'm very much missing right now, 5 months later.


To keep the design simple and open looking I decided to do away with any rails and use the thickness of the shelves to create tenons and join the whole piece together. The legs are set splayed outward, so when cutting out the tenon the octagonal join had to be cut at the correct angle. The legs had to be mortised with an angled jig. A bit tricky and with its fair share of head scratching, but massively satisfying when it all came together. Over extension of the edges of the shelves around the legs meant I could mark and plane them back to meet the corners of the octagon later on.

The time had come to make that push toward a 3D form, something to demonstrate the potential of this woodland based process. I designed a component table leg that requires simular replicas and strength to function. Through my previous tests I knew there were all sorts of factors and restrictions that narrowed what form it could be. Firstly, the pressure needed to be even across the whole part, varying thickness of material would hinder any successful bonding. The fluidity of the material is obviously very static, so high or steep sides would be difficult to achieve. Sides would also not bond well because of the nature of the applied pressure being in only one direction. The tooling itself would have to improvised as anything CNCed and made to withstand these pressures and temperatures will cost a fortune.
Considering these factors, this table leg was designed and David Watson, my very awesome and helpful Blacksmith set to work fabricating a strong press mould.
Next, to scale up my Woodland Labortory into a Factory where I can boil up my shavings and compress my big mould efficiently.
Digging up sticky mud littered with rocks and stones is not much fun. It took a week to dig the holes for the bath fire pit, the compression press kiln and build the kiln walls. These walls were built with a tradtitional cob material; the reclaimed earth and clay was mixed with straw and used as a mouldable cement. Houses were traditionally built this way, providing breathable and insulating walls that could last for centuries, all from the materials around the site.
The weather gods were not on my side. I had one window of opportunity for Dom Bush, the filmmaker to film the process in good weather. In the run up to that day a freak flood, just in a 5 mile radius around my wood, descended and my newly dug holes were filled with water. The whole area was thick with mud everywhere. I had one day left to finish and get it fit for filming. Luckily Jonathan Leech, a local woodturner had a huge dumpy bag of Yew and Cherry shavings to hand that covered the mud beautifully and made The Woodland Factory useable. A close call, but a very happy turnaround.

With the Woodland Laboratory and new compression jig set up I set to work tweaking the process again and again until I had worked out the exact formula to make my Lignin board. I needed to find out what wood available in the woodland would work best, if any. My experiments also needed to work out the best compression and drying process. There were certain controls in the set up that were not changed; 300g of green (fresh) chainsaw shavings of each wood type, 2.5 litres of cooking liquid and around 1 hour of cooking in a pressure cooker. In total there were 25 tests done with this set up, with each test something new was learnt or observed and the next test was tweaked accordingly, sometimes this even included the controls. Through this trail and error method I learnt about my material, its particular behaviours and fine tipping points of its process.
The early tests were fairly fragile and not at all strong. They stuck to the mould, came out damp, expanded once released, burnt, came out uneven or crumbed completely. Sometimes I thought I was wasting my time and it just wasn't possible.
I added foil to help release the samples from the mould. Measuring the shavings and making sure they were spread out evenly under the compression plate also made a huge difference.
I was using the blow torch onto the surface of the mould but with no insulation. I knew from the beginning that this wasn't at all efficient and was frustrated that all the heat was going out into the atmosphere. I also dreaded heating the mould with the bottle jack so close to the blowtorch. The mould was modified so two bars could be slipped through the mould to hold the pressure plate in place and the bottle jack removed so the whole mould can be placed in a kiln for heating.
Unfortunately it didn't work. It needs to have constant pressure applied throughout the process, especially as the water is forced out. I was also experiencing most of my samples coming out damp. I couldn't quite understand why parts of the sample were promising and bonding well and others just flaky shavings.
The tests continued. I stopped using potash, water seemed to work better. Oak, being very dense, was near impossible to get to vaguely work so I ditched it. Ash was the most consistent in postive results, but none were bonded evenly across the whole sample.

Then that ureka moment! Drilling holes into the top compression plate allowed the water to steam off easier. All those times when I openned up the mould and the sample expanded or felt damp, it was because the steam could not escape - so obvious!
The first sample with the modified mould was a great success. It was dry, solid and strong with very little flex. I was able to cut it with the bandsaw. Once I had continuously made simular samples, all in Ash, I got their strength tested.

I owe a huge amount of graditude to Paul Burke, Civil Engineer Imperial College and fellow honourary Cumbrian. Paul is incredibly knowledgable in sustainable energy and policies. Many a tea break have we discussed the various alternative energies available or being developed. Thankfully, he completely understood where I was coming from on this quest to find a relevant use for coppiced wood and was never too slow to remind me how worthwhile it is.
Besides bigging up my lagging confidence, he very kindly helped to test the stress point of my samples to see how strong they are, especially in comparison to existing OSB products.
My Just Wood material has the stress point of 9N per mm. That's 1/3rd of the strength of the same thickness OSB! Not bad for a few handfuls of chainsaw shavings.
With my process and material perfected it was time to take the next step - moulding forms!
A long over due post detailing that final push of my Master degree project, Just Wood. I left the last post basically describing all the resaerch I had compiled and how I could pull it all together into one perpetual cycle of growth, harvest, waste, process, product and back to growth again. It was a rabbit hole that I was reluctant to leave and with hindsight (it is a wonderful thing) I was causing lots of conundrums for myself. That's what happens when you can do anything.
So here's how I went from my first successful sample of Lignin Board (glueless wood material made by compressing waste chainsaw shavings - blog post here) to a process that generates strong, formed components for use in furniture, all in my wood somewhere in the depths of North Cumbria.
I knew the basic principles of compressing cooked shavings will work, I had a very exciting sample. The next job was up scaling that set up so I could perfect the process, see what works and what doesn't and hopefully produce a production line for manufacturing a component of some description.
Off I went to find a Blacksmith. The wonderful thing about Cumbria is that you're never to far away from someone with a shed, making anything or everything in metal, or wood, or clay or wool etc. Fortunately, 15 minutes away in Gilcrux lives David Watson. A blacksmith who specialises in fabrication and Norman forges. It was through his hard work, unwaived patience and endless cups of tea that I was able to push my leftfield ideas.
First off, he put together my test frame, designed to hold a 20 tonne bottle jack that will compress my cooked chainsaw shavings.

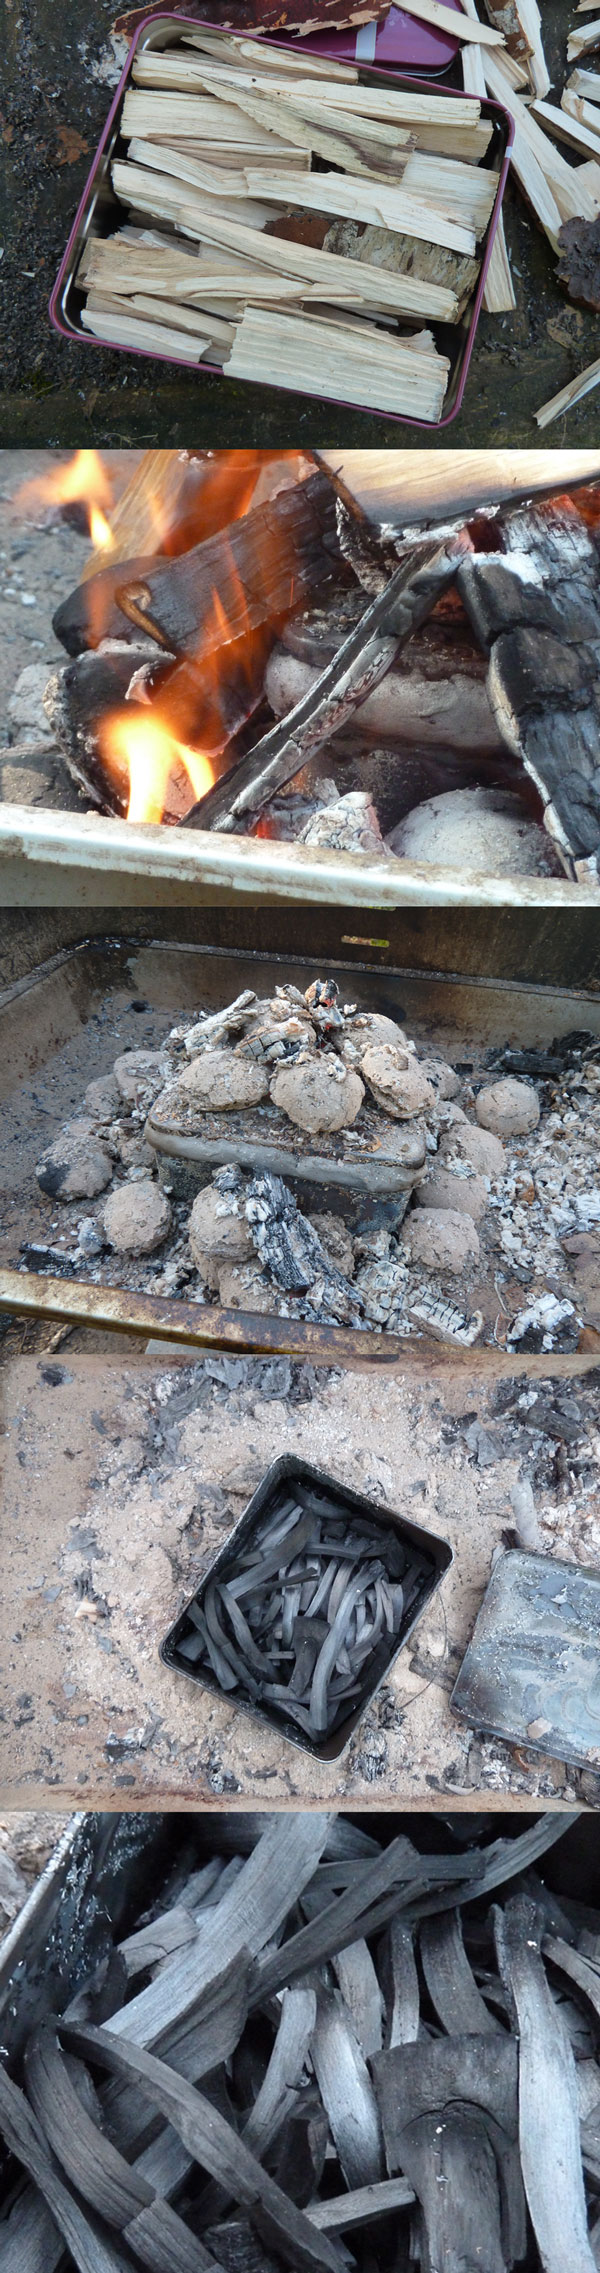
A little butane blowtorch didn't seem to be the job, and my fears were confirmed when the mould was prized open. The shavings were still damp. The pressure did not seem to have been enough however, were the biscuit tin had a seam or corner the shavings were looking more like one material. Not the best result, but enough to get me thinking there was something in it... I had to go bigger. Welcome to the Woodland Laboratory! (aka Pip Towers) My home for the next few months.
I moved in with shavings from 4 hardwoods typical throughout my wood, a few fermentation jugs full of my homemade alkali potash, a stove and a pressure cooker.
I had a new re-useable metal mould made up. A box with drainage holes, removable bottom and top pressure plate. Along with a proper butane blowtorch, I was ready to go full kelter and perfect my process.


 I have to say, I had never used a 20 tonne bottle jack or blow torch before, and certainly never together, at the same time, in close proximity to each other. To say I was tense and nervous would be an understatement. Safety marshal Chris was on hand - somewhere behind a large Ash tree. After all the varied ways I did this process and all the things I learnt each time, the fear of something bad happening never left. Don't try this at home is all I can say!
 In my last post I finished off by mentioning my increasingly love for my chainsaw. Yes it's loud and powerful. Yes I get to cut down trees - hugely satisfying. But essentually the chainsaw is a brilliant tool. While I was making my shaving horse I got a little impatient chipping away carving the seat, so I thought "Blow it, where's my chainsaw". Finding that with gentle encouragement and careful blade direction the chainsaw can make light work of carving, cutting, boring etc. Could this transfer into furniture making? Could my chainsaw be a portable mortising machine?
Again, using the Crack Willow was not the ideal timber, but I wanted to quickly test out the ease of boring out a mortise tenon joint. I was surprised, it wasn't ideal doing it freehand, but perhaps a jig could aid in accurate cuts.
My friend Paul, a greenwood worker and forester, helped me sketch up this 3D model to play with directions, pivots and heights that would be useful as a portable chainsaw CNC. Why was I so intent on using my chainsaw, apart from it being a fast and efficient machine?
At this point I had researched my material and the role it plays in the environment from the minute molecular level, the small scale craft traditions, all the way up to the industrial forestry management of softwoods. At each point there was always a cycle back to starting point - the woodland eco-system. No matter how big or small these cycles are, they could produce a number of by-products workable into my process. Chemicals, fuel, raw material, adhesives.. the list goes on.
By Charcoaling I was experimenting with the pyrolosis process - decomposing wood by heating without oxygen. This process gives off all sorts of gases, inparticular Carbon Monoxide, Ethanol and Methanol, all extremely flammable. YouTube is full of fun, crazy people using the gases in systems to power electrical generators, lawn mowers or even running cars around Europe! The best example I found, and the most fascinating fella doing amazing low tech things in the name of off grid eco living, in Texas - AllEnergies
In the quest for an on-site holistic system for manufacturing, generating my own power from wood felt like a momentus step in the right direction. I had discovered a simple moulding process for cooked chainsaw shavings, but I just wasn't satisfied - This project has researched into so any aspects of wood, as a varied resource. My imagination got the better of me, I wanted to run an electric chainsaw on wood! What a perfect loop that would be.
Cut down a tree. The trunk is planked, the shavings collected. The brash and branches are seasoned for firewood to boil the fresh shavings to mould. The heat could also be used to generate woodgas. The woodgas can be conbusted in a generator which in turn charges a battery for the chainsaw... etc etc. Had I more time during this project, I would have loved to see this happen.
 Here's a fairly late update from Jan's wood. Since my last post, March in Cumbria has been a whirlwind of all sorts of weather. There was, of course the mad snow storm which blocked our main road, and then while most of England was bogged down by heavy, relentless rain, we had 2 weeks of gorgeous bluebird days, extremely cold and windy, but wonderfully sunny. I managed to warm up the camera long enough to give a little idea of where I've been working.
 As soon as I got back to the woods from a good trip to London, I needed to get back to the wood and play, learning from books written by those who specialise in this organic material. By learning to use and manipulate the greenwood's properties like so many talented craftsmen before, I hoped to find way of developing a system that will allow me to create furniture. I'm a sucker for symmetry and I like to design the outcome, it's the control freak within, however, greenwood does not conventionally work this way. Perhaps there could be a compromise? Cleaving is a fascinating process of knocking a blade down the centre of the wood. It will naturally split along the grain. If the split travels in the wrong direction the tool, called a froe, can be levered one way or the other to encourage the split along a clean line down the length of wood. Hence, to and froe! This has given me some beautifully symmetric material, albeit still organic and irregular.
Another brilliant use of greenwoods properties that I have always wanted to explore is shrink joints. When felled, timber has the moisture content of 30% upward to as high as 60%. As it dries the cells shrink. Greenwood workers turn dowelled furniture components, pre-dry them and use them in green mortise holes. These mortise holes dry and shrink around the pre-dried tenons - glueless joints. I love this method, using only the natural behaviour of the material to construct solid furniture.
So I mocked up a silly chair sketch. Crack Willow was really not the most sensible wood to use, I'll admit. I have to add, during this point I was aware that this traditional process involves a long time. Greenwood workers are calm. patient souls, allowing their material to slowly dry or season. Unfortunately time is not my luxury, and in the scheme of trying to find an industrial process for greenwood, these exercises were not proving the right direction. While I was in London, and with access to the metal workshop at Uni I thought I'd have some fun making my own tool. I love the concept of cleaving, but I wondered if that moment of splitting could be capitalised to form extruded shapes. Would I be closer to making my uniform components from supple greenwood?
Nope. The middle 'punch' of my tool did a good job of dowelling my log, until it got wedged in the grain. As for the splitting froe wings, the split ran away in front of the tool as soon as it got it's teeth into the end grain, so all control was lost. As this tool was a complex and lengthy process to make, I abandoned this idea. However it certain helped me understand the nature of the grain and inner structure of my wood. It did a great job of creating perfect tenons for my shaving horse legs!
While playing in the wood, making a shaving horse and fiddling with these ideas, I have become increasingly appreciative of my chainsaw. It makes light work of rough shaping and cutting to length, but it creates a great amount of mess. There are shavings everywhere! More about chainsawing next time...
 I had some willow shavings soaking happily in my potash alkali for a few weeks. Time had come to do something with it. Going back to the advice from Bio-composite Centre I re-boiled the solution with a bit of whisk/friction. After a 2 hour cook the shavings were scooped into my make-do metal mould. It was G-clamped up as tightly as possible and left to dry.
The shavings were checked after 3 days. Were the wood had dried and had been compressed the most, there was definetely bonding. Exciting stuff!
The sample was placed back in the mould and the whole thing was placed over a stove to apply some heat. It was left there to sizzle away until I was sure all the water had evaporated away.

Once everything had cooled, the clamps were removed. The shavings had successfully bonded together. The surface that was on the metal mould side and over the heat had a very smooth and shiney finish. I had created my own glueless particle board, a course masonite board.
I can only presume the cooked cellulose and lignin had acted as a bonding agent when heat and pressure is applied. Unforuntately the the material isn't water resistant, but there is still some potential with this aplication within my woodland.
 Getting preoccupied by the nitty-gritty of wood and what-not can really become distracting. I decided to go back to the wood, how it is now and when I freshly harvest it. What if I prepare the branches for bends or joints before I boil them? How long will bigger samples need in my pot?
I had a while, nearly 48 hours, to wait while my branches softened, so I made up a simple bending frame that will hopefully allow me to be flexible with my angles later (excuse the pun!)
Getting preoccupied by the nitty-gritty of wood and what-not can really become distracting. I decided to go back to the wood, how it is now and when I freshly harvest it. What if I prepare the branches for bends or joints before I boil them? How long will bigger samples need in my pot?
I had a while, nearly 48 hours, to wait while my branches softened, so I made up a simple bending frame that will hopefully allow me to be flexible with my angles later (excuse the pun!)


 We have begun to record a short of my work in the wood. Dom Bush, from Land & Sky Media has been visiting me in Jan's Wood to film a hefty Willow tree being felled.
We are also playing with stop animation to capture the regrowth of the tree, and the changing envirnoment throughout the spring and summer.
We have begun to record a short of my work in the wood. Dom Bush, from Land & Sky Media has been visiting me in Jan's Wood to film a hefty Willow tree being felled.
We are also playing with stop animation to capture the regrowth of the tree, and the changing envirnoment throughout the spring and summer.
Watch this space for more updates on this exciting project.

With the remaining wood liquor from my cooking, I wanted to test evaporating it off, the times it'll take and the residue left behind.
 The liquid is reluctant to let much water evaporate away. The wood liquor with crushed charcoal left a very interesting goo. This test was done a month ago and the goo is still drying / hardening. I'll definitely keep an eye on it, as well as make a bigger sample to cook further.
During my search for the sacred Lignin I was put in touch with the Bio Composites Centre, associated with Bangor University, North Wales. The lovely folks there were very kind to sit with me and discuss, in detail, my projects ambitions and set restrictions. I have limited my material palette to everything that surrounds me within Jan's Wood, with the addition of fuel for a chainsaw. Could organic chemistry provide all the key ingredients to make a mouldable material? I had been soaking and cooking wood in homemade Potash, created from wood ash - is this an adequate alkali to aid in the break down of my wood? Unfortunately they had to let me down gently. Lignin is a tough tough substance, separating it from the cellulose without strong chemicals like Sodium Hydroxide would be a tall order, or perhaps a miracle. OK - if I haven't been extracting Lignin during my cooking tests, what have I been left with?
Lignin is a complex and un-uniformed molecule structure with strong bonds. Within Lignin sits long but weaker glucose chains of Hemi-cellulose. When soaked and heated these sugars are the first bonds to be broken and released.
Bio Composite, Bangor gave me a recipe to test out an extraction of my own Hemi-cellulose, which I could use as a glaze, or perhaps a wood treatment....


As soon as the Potash (Potassium Carbonate K2CO3) was poured into the Willow shavings the colour change indictated that some reaction had happened, I much quicker reaction compared to soaking wood in water. The solution was boiled for 2 hours and the colour had become a wonderful deep red with an interesting fragrance. It was this liquor that I needed.
As the Potash, a fairly strong alkali, needed to be nuetralised, a standard acid was added until pH 7 was reached.
I was advised that an alcohol will react and condense together the sugars of the Hemi-cellulose, so Meths was trickled in until cloudy clumps formed. 
Chemistry was never my strong subject, enjoyable, but baffling. Besides this being a complicated process, I was stabbing in the dark. Not being able to decipher exactly what I had created meant I had to abandon this clever chemistry and move on. Furthermore, this process involved large external ingredients with next to no yield of ... er... an opaque reddy/brown liquid that never seems to dry. Joy.
I'm on a quest to find a future for England's 649,000 hectares of unmanaged woodlands. Every year around 4 million tonnes of unharvested English timber is ignored, that equates to 800,000 tonnes of carbon store. To bring these forgotten plots of land back into management we could not only provide British industry with a vital raw material and fuel, but enhance and re-establish our declining wildlife, and ecology, something that can have a positive trickle effect on our agriculture.
My landlady's woodland, "Jan's wood", is my case study. What economical manufacturing process can I create within this 45 acre woodland, neglected but bursting with potential? So far I have been learning the intricate chemistry that lies within trees, and how this chemistry makes wood behave the way it does.
In particular, I have been referring to England's historical woodland based craft to understand how generations benefited from this material long before the Industrial Revolution.
Charcoal is created by heating any organic material (animal or plant) to temperatures up to 300 C in the absense of air. It is essentially carbon, the atomic building block within everything on this planet.
However, it was not charcoal that I was in hoping to collect. The heat creates a chemical decomposition of the wood, releasing a whole pick'n'mix of chemical goodies in the smoke - Pyroligneous Acid. Traditionally the most sought-after ingredient amongst the condensed fumes in acetic acid, used as a fixative in dyeing cloth. Today, wood vinegar is promoted across the Far East as an organic and cheap pesticide and fertiliser.
I wanted to see if I could add to the chemical by-product menu I was developing to aid in my physical break down of wood. All in the exploration of the wonders of wood.
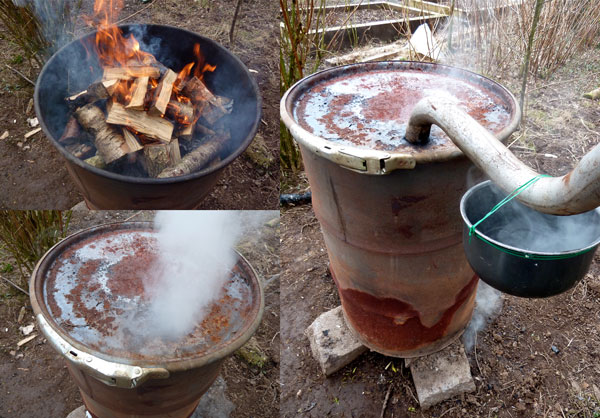
Frank, my little workshop helper, was back to help with the first burn. (If you spy any safety concerns, please ignore) ;)
A donated Transit van exhaust pipe was the perfect cooling chimney. It got incredibly hot, another source of energy perhaps?!
Only a small sample of the wood vinegar and wood tar collected. The yield was impressive considering the small amount of wood in the burner.
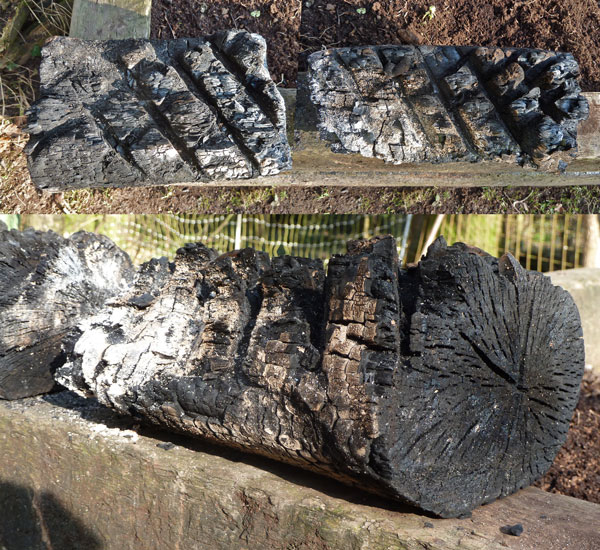
What a let down, it turned out to be a bit of a fail. My eager need to shut the burner down led to a drum full of chared wood. At least it was dry.
We decided to have a BBQ, regardless. Everything was looking very hopeful, until the burgers went on. Sod's law it would die!
What is refinement? Investigate the refinement of a base material towards the creation of a refined product. My starting material had to be wood. However, coppiced wood has been a draw to me for awhile due to its totally sustainable and low-impact cycle.

Coppicing is a tradition of woodland management; working to a cycle of growth of trees which have been sensitively selected and felled for regrowth. Trees have dormant buds lying in wait under their bark in defense to damage, like getting munched by Mammoths or stamped on by any other significant mammal. As the network of roots remain, replacement growth happens considerably faster than for a new tree to grow from seed. For centuries humans have manipulated this natural trait to provide an abundant supply of raw material. After every harvest, a tree stool will provide, on average, 3 times the number of new shoots. Historically, coppiced areas are left for 5-7 years to regenerate and produce quick grown, straight poles, prime for the greenwood craft industry.
Essentially, coppice is a sustainable and truely renewable source of carbon-neutral material. Whats-more, its potential is everywhere. There are around half a million acres of unmanaged woodlands in the UK. To see a new wave of industry utilising this resource for our markets and manufacturing would be a huge step forward for the conservation of our countryside.
The draw back in working with such a material is that it's inherent beauty and purity, it's organic-ness makes it difficult to take coppiced / green wood forward as a realistic contender for batch production. To work with it is labour-some and time consuming, if not for stunning results. Now, how can I make afford products with this environmentally affordable material?

Of all the green wood craft, I am most intrigued by Swill Baskets. The principle is taking green Oak, granted as straight as possible, and boiling it for at least 24 hours allowing it to be split to fine strips. Essentially the wood is being made into a generic form of itself, to be flexed and weaved into a basket. As it dries the wood hardens and the basket becomes incredibly strong.
It is the reaction of the wood to the boiling that has intrigued me. What happens to the make-up of the wood to make it go pliable when wet, and retain shape and rigidity when it dries?
To understand wood a little better, on a microscopic scale I got in touch with a research scientist from Innovia Films. They produce cellophane by the tonne. Cellophane is pure cellulose extracted from wood pulp. The process of extraction is fairly similar to paper making. Huge quantities of wood pulp are re-boiled in a water and Sodium Hydroxide solution; a soup that speeds up the separation of cellulose from the 2 other essential ingredients in wood (The Kraft process).

Now here's the bio-chemistry bit. Wood is made up of cellulose, hemi-cellulose and lignin.
 Cellulose is the structure of the wood. The molecular fibres which act together to create rigidity.
Hemi-cellulose is the 'string' that holds the cellulose fibres together.
This knot of cellulose is set in lignin. The 'resin' which glues the structural molecules together.
When the cellophane and paper makers, as well as swill basket makers, boil their wood they are diluting the lignin. In the example of boiling and steaming wood in the wood craft industry, the dilution of the lignin allows the wood to be bent and formed into new directions. As the water evaporates and the lignin condenses, the wood stiffens and retains its new shape.
From this finding I have been developing an interest in Lignin and what it's properties could be used for. Although a waste product from these different techniques, it has a great calorific value, it has more carbon content than wood itself. The Kraft process burns the recovered lignin to recycle its energy back into the system.
Understanding these two comparably different scales of wood manipulation, I started to wonder if the use of Sodium Hydroxide (Caustic soda) in the industrialisation of cellophane was completely necessary. Reading into the science of woods molecular bonds I believe a high pressure and high temperature hydrolysis method would be enough.
First step: Try to cook and separate wood at home with a Pressure Cooker.

 view")
The smaller the carrots the quicker the cooking, right!? I reused the brown water from the previous cook. I figured I'd intensify the concerntation.
Although the sight of a pressure cooker steaming away on the stove was a regular occurance during my childhood, I have no idea how to use one, especially when cooking wood for 6 hours. The water levels were calculated wrong and that was the end of this test.
These tests were an interesting starting point. I've been left with some interesting brown liquour. Somewhere, floating in this milk bottle is weaker bonded lignin. The wood has barely changed, so the cooking process definitely needs taken up a knotch or two.
To the laboratory...
Design Products MA: Platform 15 Project #1: Make a vase (a container that can be used to hold cut flowers)
My first project within our platform was a quick 2 week introduction to myself and my approach to briefs. We had a very interesting crit yesterday, it always amazes me the contrast and extreme differences of peoples response to projects at the Royal College of Art. Really fascinating!
Make a vase, a container of cut flowers. I considered on answering this brief with questions of why and how we, as a curious race, chose to capture moments of natural beauty out of context to its real existence. There is the view that it can be seen as the start of desire and not need, which brings us to consumerism and social impact our desires have on the world in all its facets. The can-of-worms wiggles out in all directions and bigger picture get even bigger..
The thing is, this opinion / observation is integral to who I am, and what I believe. The path I have made for myself is an expression of debate, mainly because I'm rubbish at verbal debate, I can only demonstrate. My reasoning for pursuing wood and hand craft is in response to these heavy issues. My ethos and morals are born from these realities. To some I might appear to be restricting myself to success and money, but that is not what I desire. I work to explore responsibility. Desire is a natural human trait, it is here to stay. However, it has grown to a point of distraction and destruction. Can we provide for our desire with a sense of responsibility?
So, it was a bit of a cop-out to chose to create my vase with wood, however, I knew my reasoning and debate was there in so much more depth than I think I could have presented in 5 minutes.

Essentially, a vase is a vessel to contain water. Besides tools and clothing, utilitarian forms to contain and transport was a change of man dictating his environment for his own convenience. The bucket or barrel, to me, is an incredibly important object. The idea to use the swelling properties of wood to create a watertight vessel represents the most intuitive use of material and it's properties. Wood is a living material. It comes from one of the most important living organisms on this planet. Nowadays the movement of a piece of wood is seen as a hindrance, an inconvenience. It's is engineered to stay flat and straight and square. Tamed for our desire. The wooden bucket is the product of skilled workmanship that only comes from an inherent understanding and respect for the material. It is very sad that this skill is becoming extinct. These days barrel making techniques are replicated by fast moving machines. When the last Cooper Master has gone, will the true understanding of cooperage and its unique understanding of wood be lost with him?
I wanted to explore the coopered vessel. Not reinvent it, just play with it. Stereotypically the bucket is defined by the structural steel rings that hold the swelling slats of wood in. Without them the bucket wouldn't work. However, I am making a vase, an object of desire and not utilitarian need. I wanted to create the vase without the 'bucket rings'. Ironically, my solution meant I had to CNC a precise bottom section that would replace the bottom ring. All the past coopers simultaneous turned in their graves!

I have been reluctant to embrace the CNC machine, but now that I finally have I will have to admit I'm ever-so-slightly converted.
For the tapered shape of the vase and for the success of a watertight product I needed to create precise side slats. There is very little room for mistakes. The angles are so important, half a degree out will not do! I made a jig with my hand plane and spindle moulded each slat as close to the finished width as possible.


 Replacing the top ring is where I got experimental. Flower arranging is great, but sometimes the flowers don't really stand up as well as you'd like. I figured a tension wire system on the inside could replace the top ring and provide a grid for the flower display. This is when doubt was expressed by a few members of the workshop. Wagers have been made, the stakes are high!
Bango machines and violin pegs were used for the pivot points. Two patterns of wiring was tried. The one with 2 machines worked best.
Here we go...


OK, it leaked! But I had suspicions this vase would, the bottom joints between slats weren't tight enough. I figured they would swell enough to compensate. However, the top part around the tension wire was fine, completely leak free. Does that mean I won the wager?! The test continues...
Final blog post of the Wedding Gift. It's been interesting going through all the pictures and remembering the extremely late nights and totally unknown outcomes. Ahh good times. But the plan finally came together, to a sigh of relief. Here's installment 2 of 2, Making the leaf relief picture. From the start of this project I wanted to combine the wedding seating plan with a wedding gift for the newly weds. The seating blocks came first, then the idea to set them in framed picture. It was tricky trying to think of an image that wouldn't be over bearing to the whole scheme, as well as being considered ugly by the bride and groom. It had to be subtle; white would be the colour, with detail pulled out with shadows - a relief in plaster! The subject for the image varied from shared personal interests of the couple to toally abstract forms. Neither seemed visually appropriate. Instead I looked for symbolism of all that I wish for the happy couple's future.
"The Oak is the mightiest of trees and symbolizes strength and courage. The ancient Romans thought oak trees attracted lightening and thereby connected the oak tree to the sky god, Jupiter and his wife, Juno, the goddess of marriage. Thus, the oak is a symbol of conjugal fidelity and fulfillment. The oak tree was regarded by Socrates as an oracle tree. The Druids likewise ate acorns in preparation for prophesying. In addition, the Druids believed the leaves of the oak tree had the power to heal and renew strength." Living Arts Original
"The Sycamore is one of the oldest species of trees on the planet. Given its age, the Sycamore is often referenced in the pages of history:
For ease of display during the wedding I worked out how many blocks would fit comfortably and clearly, evenly spread out and easy to navagate. Rounding up the number of blocks to 180 created two frames measuring 800 x 410 mm each internally. One Oak, one Sycamore. The rest of the scheme was built on from here.

Retreating into the clay studio I'm fortunate to have in our garage at home, thanks again Jan! It had been a good 11 years since I worked with clay, boy I have missed it. Memories of Carly Simon singing during A-Level Art classes came flooding back.
Working with plaster and solid wood was going to be heavy. To reduce the weight I had to make individual tiles so the plaster can be thinner and easier to handle without a risk of damage.
Music was set up and coffee brewed...


They were going to be individual tiles but I wanted to keep the image as a whole so the composition ignored the tile seams and the leaves overlapped them as much as possible. When I made a test of casting leaves from clay I was amazing by the incredible detail that is picked up. What I found was, if the clay remains moist, the leaves can be imprinted with a sense of movement and form.
Steve Younger, the furnitiure maker at DF Furniture kindly made the frames for me. Here, he is working on the finishing touches of the Sycamore frame, cutting away the excess veneer of the kerf joint. The tactile finish of Steve's work is always remarkable, certainly his particular trademark. Feeling is believing. (Louie the dog, I love him really)
There was one very hairy moment right at the end when the plaster was still considerably wet. Luckily a slow cook oven setting sorted it out just in the nick of time. Clay has been a joy to use again, plaster is exciting however it maybe a while until the next time I use it.
The scheme was amibious and a lot of enjoyable hardwork. It was fun designing for an event, a one off moment involving a number of people. I am eternally grateful to my parents for humouring me and my plans. For Oliver and Emma for asking me to be a part of their special day. A special thank you to everyone at DF Timber, Kim Butler, Jan Walker and those at the Square Orange that helped through the ups... and the downs. Couldn't have pulled it off without you. x

Here is 1 of 2 installments of the Wedding Gift. In this post I will whiz you through the process of creating the seating plan blocks and their etching. While planning this project I had in mind creating lengths of the necessary forms and then cutting them down to the appropriate size. However, when you are creating something fairly new and untested, plans are soon swiftly amended. I was fortunate enough to find all the timber necessary as off cuts in the machine room. Unfortunately, once they were machined and sanded to size, then passed through the spindle molder with the wobble saw, the lengths weren't as dead straight as I needed them. The natural tension in the wood is always at risk of giving way when it is brutally machined and shaped.

As soon as I had the lengths in the workshop and had set up the router table with a dovetail bit, it became clear I would have to fit the internal Sycamore strip to each individual block. It is in this situation that a fraction of a millimetre becomes magnified, and can make a break the quality of fit. By doing it in this painstaking way I could guarantee a perfect fit throughout the project, which was one of the more important details for me.

I wanted to create a patchwork of colour to show off the incredible natural colours of the material. Here they are in all their glory, from left to right: Oak, Yew, Cherry, Elm, Walnut and Ash, each containing the light coloured Sycamore strip.

There was a few days of hand planing the blocks. With a marker on the shooting board I trim them to size, while cleaning up the rough saw edges. My right arm was considerably bigger than my left afterwards!

On the final day of planing, a jig was made to hold the blocks while the Sycamore strip was planed back to leave a clean leave surface on every edge of the blocks.

Now, off to the Eden Valley to visit Joe Butler. Joe and his Father, Ian run Croglin Toys, the sweetest little toy workshop, based in Lazonby. They very kindly let me loose on their laser cutter, so I tucked myself up in their tiny little workshop to add the finishing touches to my Wedding Gift.
A grid was cut so the positions would remain the same. Each table was etched at a time, to avoid confusion or missing someone out. Final checks of spelling, number of names per group and laser settings, then *click sit back and watch. It's meserizing seeing the lettering emerge as the laser head darts left and right.As everyone in England is well aware, this summer has left much to be desired. Cumbria has had record amount of rain during June and July, exactly the time I was beaving away making these blocks. When I was about to head down to Gloucester for the wedding I did the final fine tuning to the sliding Sycamore bit. I convinced a little helper to pretend to play "wedding guest" and test the friction, and adjusted them accordingly. A quick rub with scented wax and they all slide wonderfully.

This project has really highlighted to me the difference humidity makes to this natural material. The temperature difference was considerable on the way South, and the blocks shrunk! I was gutted, my lovely fitting blocks were all loose. Ah well, the way of the material. They all looked smart lined up next to each other... and everyone managed to find their seats, which is the main thing.
I must admit that before working at this workshop, I didn't really like natural edge. Funny really seeing as the likes of George Nakashima and Wharton Esherick, to name only a few, are my heros. To use it, it has to be used well. Too much and you're teetering toward that horrible 'rustic' appearance. So for this project, a picture frame for a wedding present, I surprised myself that I decided to embrace that waney edge gamble. Initially I wanted to have two sides bookmatched, with some fascinating burr. Unfortunately natural edge limits you to specific types of wood. Elm is ideal because it generally has little or no sap wood. (the lighter coloured wood between the bark and old trunk of the tree.) Sap wood rots and crumbles, it can be pretty unstable, so best avoided for this situation.
We looked far and wide for a really special bit of timber that could be bookmatched, but with no luck. However, having put together the chosen piece I think bookmatched could have been borderline rustic. At the end of the day, the frame is to compliment the picture.
Some sly little jointing and chiseling had to be done to let the natural edge meet the other edge at the mitre corner. Otherwise it was straight forward with a super sharp plane and a 45 degree shooting board.

I slipped some 0 bisciuts into the corners, just in case. Tentatively clamping up each corner at a time, making sure it's all square, the mitres closed up perfectly, even the natural edge joints. 
Both for asthetics and additional strength some kerf joints were added in a smart contrasting veneer. Once the frame had been smoothed out, sanded and oiled the effect worked brilliantly. I positioned the burr so it will sit just onto the pictures mount at the bottom right hand corner.
